Friday, April 27, 2007

Blue painter's tape.

Blue painter's tape? WTF? Why would any motorcyclist need blue painter's tape?

Simple. It makes a very nice 'helmet visor' when you're riding toward the sun!

I use a 8-10 inch piece that's been folded over slightly on both ends. I stick it to my face shield at the right position to block the sun. Then I tip my head a bit if I need to move it a little.

If I need to move it a lot, I just reach up and move it to a good spot. (Yes, you have to be able to ride with 'no hands' if you don't wanna pull over.)

So why painter's tape specifically? It doesn't leave anything on your visor and it's easy to move and remove. You won't need much, so don't bother taking a full roll on a trip. In fact, just a few pre-made strips stuck to the inside top of a saddle bag or topcase should work for most people. My recommendation is to use 1 inch wide tape. You're going to put it very close to your eyes, so the 1 inch width is effectively much wider than it seems from the outside.

Here's a pic of it in use. Nothing spectacular. Just a piece of tape.


Wednesday, April 18, 2007

Trip tips.

Lots of us think about taking trips on our motorcycles. Few of us think about how to make it easier. Here are a few trip tips that might help.

Maintenance and emergencies - Get it done before you go. You'd be surprised how many adventures are curtailed because of a bad chain and sprockets, worn-out brake pads, or bad tires. Consider the distance you have to travel (round trip) and determine if the consumables are going to last. Think ahead. If your tires will only last 1000 miles and you're taking a 2000 mile trip, what's your plan?

On this same subject, what's the status of your tool kit? Do you have one? Does it include everything you need? I keep a toolkit in my R1 that consists of:


  1. two 12mm combo wrenches for chain adjustment
  2. one 10mm combo wrench (just because)
  3. one combo screwdriver (1/4 inch drive mini)
  4. one pair of pliers
  5. one factory axle nut wrench and extension
  6. one 6mm hex wrench (fits seat and all other body fittings)
  7. one tire repair kit (plug type)
  8. one mini air compressor
  9. one tire gauge
  10. a couple of sharps (single edged razor blades, small and effective)
  11. a hand pumped siphon (sportbike tanks aren't very big)

Supplies - There are things you need to bring with you to maintain the motorcycle. One of these is chain lube if you have a chain driven motorcycle. (If you bring it, make sure you use it.) Some of you might bring along a quart or two of your favorite motor oil. Do you need a funnel for the oil? Others will bring a cleaner and polishing cloth. In this case, bring what you need and be prepared to leave the "nice to have" stuff behind. Motor oil and cleaner can be bought almost everywhere, so stashing it and hauling is falls under your own personal "nice to have".

Comfort and convenience - Gear storage is always an issue on a motorcycle trip. For some strange reason, lots of rookie travellers think it's OK to carry all their gear in a backpack on their backs. Wrong! Backpacks are OK for short trips to the store or work, but they're hell on your shoulders after a few hours. The solution? Bungee cords! Bungee the backpack (and all your other gear) to the passenger seat and tail of your motorcycle. Yes, it will change the handling a little bit, but believe me, it's the way you want to go.

General safety - First and foremost, stay hydrated. Buy a CamelBak or other hydration device. Drink water regularly even if you don't feel thirsty. It's easy to become dehydrated on a motorcycle...... there's a lot of air passing over you and water evaporates off your skin at a tremendous rate. It's common for endurance racers to lose 5 pounds of water weight over a couple of hours on their bikes....

For the same reasons, you should keep your skin covered even in the summer when it might seem smart to let a bunch of air down your chest..... The truth is that you need to protect yourself from dehydration. Being warm might be uncomfortable, but being dehydrated can be deadly.

Cell phones, medical alert bracelets / dogtags, or info cards should be where they can do the most good when needed. My cell phone has specific entries called "Home", "ICE", and "Ed (lastname) ICE". ICE is becoming a standard cell phone entry for "In Case of Emergency". Use it and set it up right now!

Info cards are easy to make. We all use computers, so go into Word and just type out all the info you think an emergency responder might need to know. Format isn't terribly important and neither is your blood type if you don't know it. There's no excuse for not having an info card.

Ok now, general info tips:

Plastic bags are your friends. Ziploc freezer bags are your best friend. Large black plastic lawn bags are your second best friend. Plastic bags do two very important things. They keep stuff out and they keep stuff in. That may sound like "DUH!" info, but consider the practicality of keeping stuff contained and/or keeping stuff protected. Plastic bags do both. Use them.

A couple of shop towels never killed anybody. It never hurts to have at least a light duty first aid kit. And as stated elsewhere in this blog - examination gloves - they're just handy.

Paperwork! If you're travelling outside your state of residence, take your registration (or state equivalent) with you. Certainly if you're travelling outside the country, find out what your documentary and insurance requirements are in advance. You don't need to be doing this kinda stuff at the border.

Clothes....... consider the weather possibilities wherever you're headed. Dress in layers so you can modify your heat retention options. Try to wear fairly tight clothes with elastic or closeable wrists, neck and torso. You want to eliminate "flapping" as you ride through the wind and you want to reduce the amount of air that enters your layers at the wrists, neck, and torso. Flapping causes fatigue of the rider and the clothes. Air entry reduces the ability of the clothes to retain your body heat. You also want to reduce the amount of evaporation so you don't become dehydrated. Visibility is a desirable feature of your outermost layer.

Ok, so I've gathered all this stuff..... and it fits in my 33 liter Givi topcase (or the backpack you might have bungee'd to the passenger seat)....... and damn, it takes up a lot of room! Where am I gonna put street clothes and some underwear?

Simple. Roll them up individually and stick them wherever they fit. Then get rid of a bunch of your "nice to have" stuff from above, and roll some more clothes up and stick them wherever they fit. Repeat if necessary.

This isn't an exact science...... I just offer these ideas and methods for consideration.

Saturday, April 14, 2007

More adjustments

Sean wrote again from Texas with the following info. I agree with him completely and not all of us think about these things. Here's his gently edited email.

It's funny how much time I spend prepping a new bike. I get a bike and then spend a bunch of time in the garage on the first day of ownership. Everything you mentioned I adjust. Sometimes, I'll even need to lightly bend the front master cylinder reservoir bracket just to get the hose to reach the new position of the perch.

On the 14, I actually needed to adjust the rear brake light switch because it wouldn't come on until very late. Not that I use much rear brake in most situations, but it only takes one time to get rearended.

Also, the throttle typically has too much play, though that doesn't add to riding comfort.

Finally, the projection headlights on bikes are typically too low for nighttime driving through corners when you're stuck in the dark. Adjusting the low beams to shine straight ahead for a couple 100 ft typically solves this problem, while not blinding oncoming traffic too badly. When riding in the corners, highbeams are still necessary to get light in front of you, but at that point the highbeams are pointing slightly upward and compensate well for the bike's lowered nose.

Thanks for the tips Sean!

I want to add one little thing to the headlight adjustment issue. Most Yamaha projection headlights have a very drastic cut-off point at the top of the beam pattern. If you shine your low beams against a building or garage door, you'll find that there's lots of light where the projectors want it to be, but there's virtually no light above a specific line.

Unfortunately, Yamaha delivers their bikes with the cutoff point at almost exactly the same height as the side view mirrors of the average car. So, as you bounce down the road behind Mr. and Mrs. Cager, your headlights seem to flash in his mirrors. Lots of light / almost no light as the cut-off point passes above and below their mirrors.

I've been given the finger, I've been sworn at, and I've been given the "fake swerve" because of this. The most common and irritating reaction I get is that the cager slows down to about 5 below the speed limit because he thinks he's being pulled over.

None of this has been a problem since I lowered the cut-off point just a little bit so it stays below their mirrors. I have high beams if I wanna flash them now.

Tuesday, April 10, 2007

Controls - adjustment.

Lots of people don't know that the controls on a motorcycle are extremely adjustable. They accept the way the bike is delivered to them, and adapt their riding to the inaccurate settings of an assembly person at the dealership. This is not a good thing.

Motorcycles are 'pianissimo' machines, not 'fortissimo' like trucks. Very small control inputs can make huge differences in the way a motorcycle operates. Put your controls in the wrong space and you might get an undesirable result. So, let's investigate some of the controls.

I'm assuming you have some mechanical skills here. I'm not going to cover step-by-step details on which way to turn nuts and bolts. Get a friend to help you if you need it.

The brake and clutch lever angle (up and down) is the setting that's most commonly wrong as delivered. In a perfect world, there would be a straight line from your elbow to your finger tips and your controls would lie under that straight line. On a sportbike, that line may extend from your shoulder to your elbow to your fingertips. See what I mean in the pic below.


See the straight line that goes all the way down my arm and extends through the tip of my fingers? In order to get this straight line, you need to adjust the angle of the controls. Basically, just loosen their clamps and rotate them on the bars until the levers are where you want them. Some motorcycle manufacturers make this extremely difficult because they put locator pins in the clamps. You can easily remove the locator pins to get the levers where you want them. It's worth the effort.

Here is a pic of the clamp and bolt for the R1 clutch.


The bolt is almost directly in the center of the pic. Loosening this bolt will allow you rotate the clutch lever up and down on the bar. Remember to tighten this bolt again after adjustment!

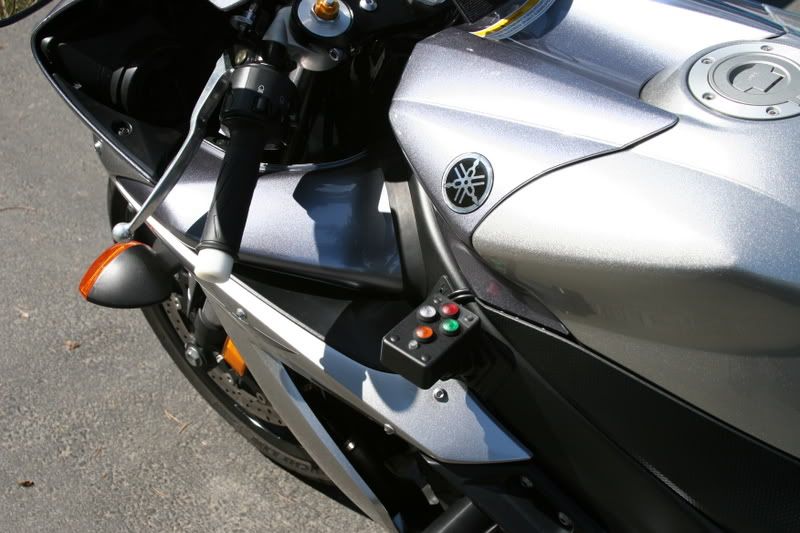
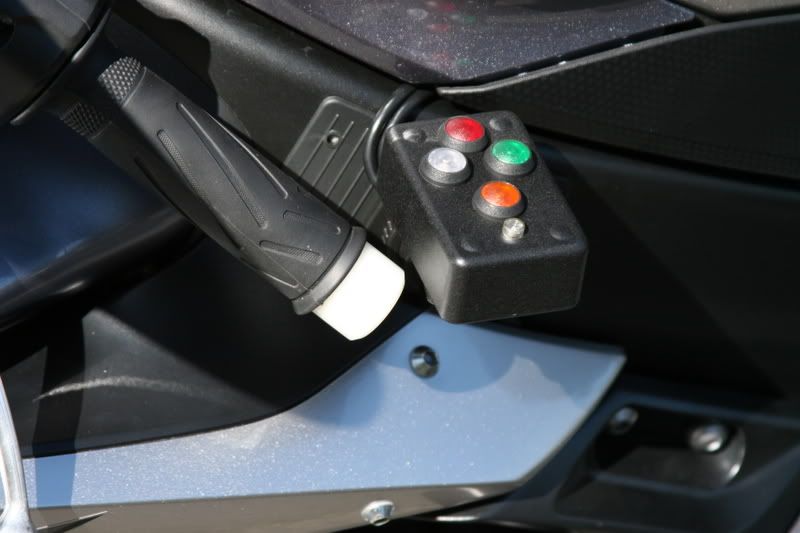
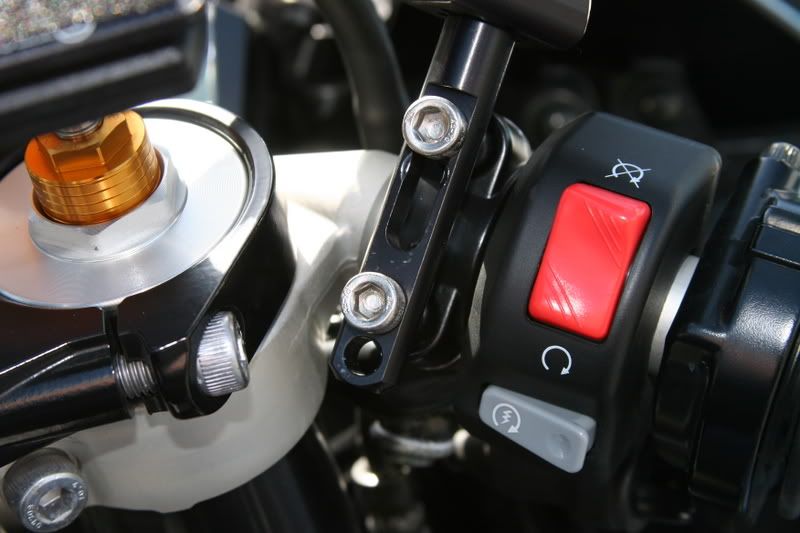
The same basic setting should be made for the front brakes. Here is a pic of the bolts and clamp for the front master cylinder and lever assembly.


The correct bolts for the R1 are the chromed pair located between the red 'kill' switch and the gold suspension adjuster in the pic. Normally you will only need to loosen one of these to get the assembly to rotate. Again, some manufacturers use locator pins to prevent adjustments, but you can remove the pins to make this right.

If you've checked your work and made sure you like where this adjustment is set, then make sure your bolts and clamps are tight and let's move on.

Now you can adjust the beginning position of the levers. In other words, you can adjust where the levers are 'at rest' when your hand isn't on them. I should note that this adjustment also changes the point at which the lever stops moving. If we change the point where it starts moving, it will also change the point where it stops moving. Why is it important to know that? Because, if you adjust these settings too far, the clutch might not disengage completely, and /or the brakes may not engage completely when you pull them all the way in. In any case, make sure your adjustments don't have undesirable effects from excessive adjustment. Normally, adjustments of 1/2 inch are at the extreme limit of what I would consider acceptable. Anything over 1/2 inch is probably very risky. Take care with this.

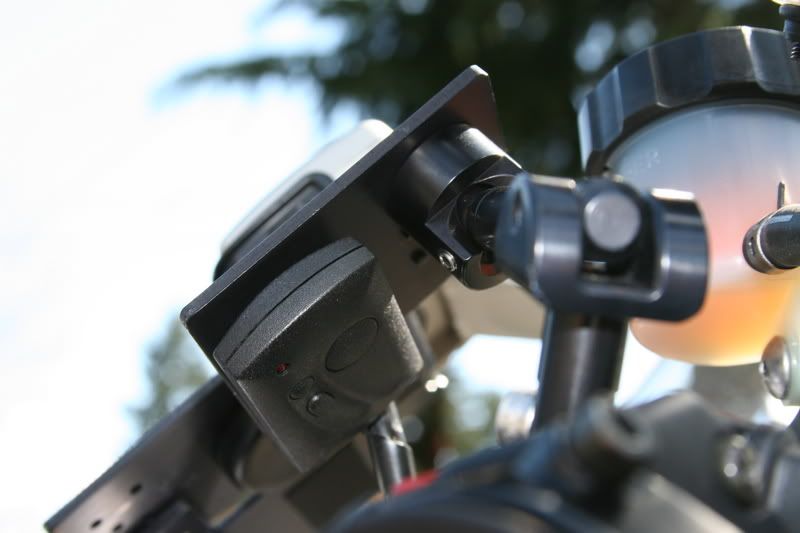
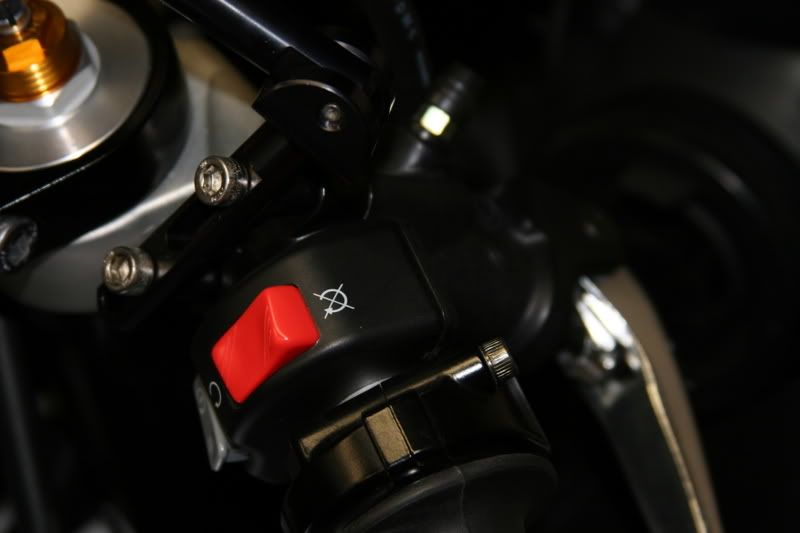
Here is a pic of the front brake adjuster on the R1. The small black knob allows you to change the distance between the bar and the lever when at rest. Adjusting this knob can be very helpful for people with small hands.


Some motorcycles have a similar adjustment for the clutch lever. In general, these machines use hydraulic clutch actuators. See your operator's manual for instructions.

On some motorcycles with cable actuated clutches (such as the R1), the clutch engagement point can be changed. Within limits, this has the effect of making the space between the bar and the clutch lever smaller (or larger) if desired. Note that if this adjustment is taken too far, the clutch will not completely disengage when the lever is pulled in. This can result in an accident or clutch failure. Make sure your clutch completely disengages if you adjust this setting very far.

Here is a pic of the R1 adjuster. It's the large aluminum wheel in the center of the pic. Simply turn it to make the lever engage at a point closer or further than it does now.


Now the hand controls are done. You've checked your work, verified everything still works correctly, and you've made sure everything is tight and 'perfect'. Let's move on to foot controls.

Huh? You can adjust the foot controls? Yup, you sure can. You can adjust the engagement point of the rear brake, and you can adjust the upshift/downshift point of the transmission. (Most motorcycles won't let you adjust the position of the footrests without an accessory kit designed for this task.)

Here's some info on the rear brake. You can adjust the position of the brake lever 'at rest'. It can be set so that rear brake is actuated pretty hard right after your foot touches the pedal, or it can be adjusted to require a lot of effort to actuate. Being perfectly honest, I've never had to adjust this setting on a streetbike with a hydraulic rear brake. Yours is probably fine, but you can adjust it if you want. 
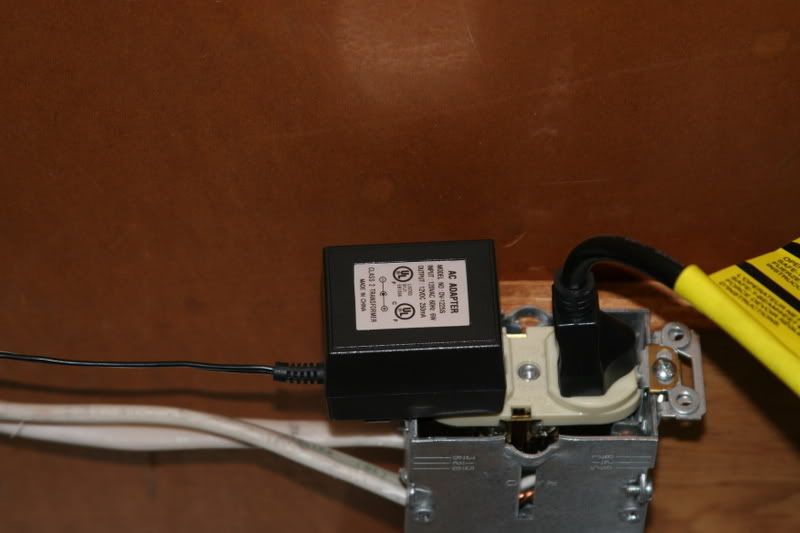
WARNING - misadjusting the rear brake for early and aggressive actuation can make the brakes fail to disengage when you release them. I DO NOT RECOMMEND ADJUSTING THE REAR BRAKE FOR MORE AGGRESSIVE ACTUATION.

However, some people like to adjust their rear brake so it takes some extra effort to make it 'lock up'. These people often wear heavy boots and / or don't have much sensitivity in their feet. If you're one of those people and you've had problems locking up the rear wheel when braking, you can adjust the brake pedal downward so it takes more of your foot and ankle motion to get the brake to actuate. The adjuster is here. If you 'shorten' the threaded distance of the adjuster, the brake lever will require much more travel before actuation.


Again, check your work and make sure everything still functions correctly. Now we can move on to the shifter adjustment.

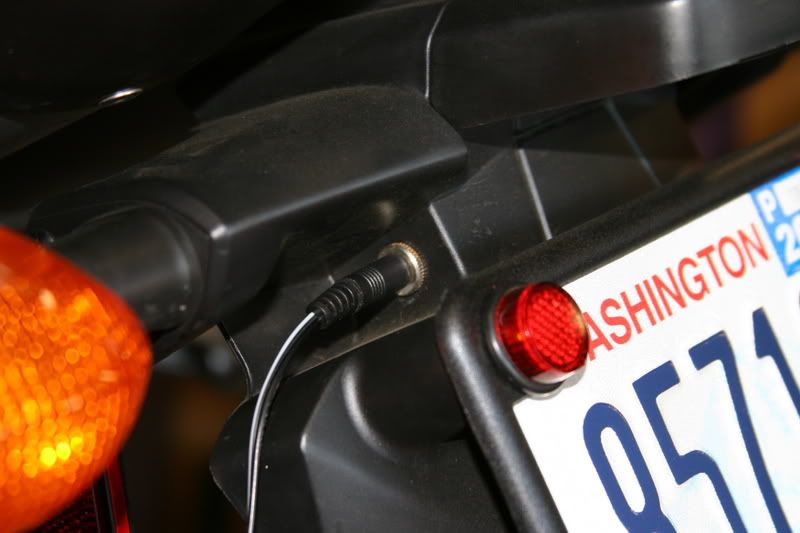
For the shifter, we're going to change the 'at rest' position. This will also change the spot at which it upshifts and downshifts. If you wear really thick boots (like hiking boots with thick soles) you might need to move the shifter upward so your boot fits under the shifter. On the other hand, if you wear boots with really thin soles and have smaller feet, you might need to move the shifter down so you don't miss any upshifts (actually quite common). Here are some pics of both ends of the adjuster rod on the R1. Most bikes have something similar nowdays. Simply increase or decrease the effective length of the rod to move the pedal up or down. Up for thick shoes, down for thin ones.


Ok, now you've looked at a bunch of extreme detail pics of my personal scooter. You've seen a bit of dirt and some surface rust. I realize some people will think I'm a complete lowlife for letting nature take its course, but hey, it's surface rust. I live in Seattle. It rains. I ride. Tough dookie. Maybe I'll get around to fixing it someday.

Sunday, April 8, 2007

Farkles - quality, not quantity

Accessories are commonly called 'farkles' in the biz. It's generally believed that the word is a simplification of 'fucking sparkles'. Get used to the term because it's what we use. It's not derogatory.

It's pretty easy to go overboard when you first start farkling. Most farklers start with way too many goodies on their accessory mounts, and as time goes on, the number of toys tends to diminish. Before you buy accessory mounts, think hard about what your needs really are. Mount prices add up while real estate goes away. This is another time to consider your real needs and options.

An overkill pic for a gag. GPS, iPod Shuffle, personal cell, Nady comm radio, internet Blackberry, garage door opener. The Blackberry can be replaced by a 3" television (true). Excessive buttonocity.

A real world usage pic. GPS, cell, iPod Shuffle, garage door opener, room for the cruise controller if I decide to move it.

Ram Mount - more accessory mounts

Mike Napurano of Texas has provided some alternate ideas to the Techmount units I use. They seem to work well in a couple of different configurations and Mike has fabricated some custom metalwork to hold his most used items. Click the pics for more detail.

Here is a pic of his old configuration.


And here are a couple of pics of his newer configuration.


Notice the fabricated sheet metal work under the GPS and detector.


Mike used mounts from http://www.ram-mount.com Apparenly a person could get completely carried away at their site. Wanna mount your laptop on your tank?

Bad weather comfort

These ideas aren't the ultimate solution to bad weather riding. They're quick solutions to getting stuck in a sudden downpour or a surprising change in temperature. As usual, they're simple, cheap, and quick.

1) Get some surgical gloves. Latex or nitrile if you're allergic to latex. Carry a couple of pair inside a sandwich bag. Use a pair of them under your leather gloves when the temperature drops or it starts to rain. They'll provide several degrees of thermal protection (no wind) and they'll keep the dye from staining your hands when your gloves start to run from the rain.

2) When it starts to pour or get cold, pull into a quickie mart or some other retail establishment and ask for a large garbage bag. You know, one of those dark green or black things in the mega-gallon size. Cut a hole for your head and two holes for your arms. Put it on under your jacket and you'll stay warm and dry for the rest of the trip.

3) Find a WalMart, go to the camping section and buy a cheap rain suit. Last one I bought was only $8. Bright ugly yellow and it lasted long enough to make it home almost completely dry. Walmart also sells surgical gloves (or you can beg some off the deli staff if they have one.)

4) Sean G of Texas says it's helpful to get a couple of those chemical handwarmers in the camping/hunting section of WalMart too. He says sometimes they're a little bit of overkill, but that's much better than frozen fingers. They're cheap, disposable, and a potential lifesaver.

Long Term Project - The Supersport Trailer.

As far as I can tell, my 04 R1 is the only one on the planet with a Givi top case on it. It's a pretty decent fab and it's worked nicely. I like the storage and it doesn't really seem to affect the bike in any significant way. But now I've got a wild hair up my ass. I want to build a trailer to tow behind the R1!

It will have to be low. It will have to be relatively narrow, it will have to be aerodynamic, and it will have to work behind the R1.

So here's the beginning of the R&D. Adding a frame and wheels to this is a no-brainer. Southwest Wheel sells independent spring units rated at 500# per pair. Frame it, mount it, and wheel it. Simple task.

Trouble is, what about the hitch? Automotive hitches won't give me the lean angles I expect from this project. I'm not building a Gold Wing, I'm building a gentleman's express. It has to be light, efficient, and responsive.

Engineering and design are underway. Framing has begun. I'll keep you posted on the progress.

As usual, pics. Click for more detail.


I should mention that this project is sitting in the garage since I sold the R1. I don't need a trailer with my FJR1300. I have enough storage and I don't travel 2-up. Anybody need the beginnings of a project in the Seattle area?

Long term project - Cruise control for the R1

I installed a cruise control unit on my 04 FJR. Unfortunately I sold the bike and kept the R1, so I now feel the need to rest my wrists again with the greatest add-on for long distance riding.

Real estate is going to be a huge issue on this project. I have an electrically actuated servo unit already, but it's proving to be a bit too boxy for undercover installation on the organic R1. I have some ideas, but I haven't progressed beyond the conceptual at this point. I'll keep updating this LTP (Long Term Project) as I go.

I've built and installed the control box for the cruise. Almost no automotive units come with waterproof switch units, so I've had to build my own. Here it is. The third pic shows clearance at full left lock. The mount is part of a Sirius satellite radio mount. The box is a Radio Shack project case that's been spray painted with with Rust-oleum Textured black. Switches are waterproof, lit by LED, and expensive as hell. The smaller clear thingie is a Radio Shack blinky. Everything is mounted with automotive grade double stick tape. No fasteners used. This whole thing can be removed with no damage or remnants of prior installation. (I might re-route the wiring to go under the mount and frame spar so they're less visible.) Click the pics for more detail.


This project was never completed on the R1. I bought an FJR1300 and added cruise control to it using many of the suggestions and installation tips used on FJRForum.com. Several recent posts here show the control unit I built for the FJR.

Keys

Half the bikes on the planet have scratched upper triple clamps. This is because most riders don't think about their keys vibrating around and scratching the triple clamps while they ride. By the time you realize what's going on, it's too late.

So I build my own keys. The R1 has its ignition key and I also have a key for the Givi monolock top case. So I cut the plastic parts off both keys, ground some of the chrome plating off the brass keys, then soldered them together to make one double-ended key. Here's a pic. It's not for everyone, but it works for me.

Bling / security

Security is always an issue with motorcycles. Here are a couple of ideas that might help make your scooter look like it's not a good candidate for a heist.

This is one I use. I dunno if it works and it's a bit "blingy racer boy". On the other hand, why would a thief try to steal something that's labelled? Here's the pic. Just an idea. No harm done.

Blinky lights are installed in every modern car with a security system. Why not add one to your scoot? Does the thief know it's fake? Hell, maybe it's a fake blinky on a bike with a transmitting alarm! Is he gonna take the time to investigate? Nah, he'll generally just look for an easier one to hoist.

Radio Shack sells a blinking light kit that uses a 9 volt battery to keep it running. You can cut the battery holder off the little circuit board and you'll have the blinky part left. This can be wired directly to the bike's battery for a perma-blinky, or you can build a little circuit with a relay that opens up when you turn on the bike. This will make the blinky turn off when the bike is running. It can be irritating to have a blinky running while you ride, particularly at night. Use the comments utility if you need a circuit description.

I'm not gonna spend any time discussing locks, cables, alarms or any of the commercial solutions available to the modern motorcyclist. I will, however, discuss two seldom-considered concepts.

1) I almost never lock the bars with the ignition assembly. I've had two bikes recovered from thefts with the ignition units broken off because the thief pulled the handlebars hard enough to break the cheap aluminum casting of the ignition unit. This gives the thief enough wire and easy access to hot-wire the bike and ride away. No more, thanks.

2) Automatic garage doors. Modern mechanical garage door units have a safety release mechanism that allows the door to be opened manually. This is mandated as a red cord with a small handle on the end to facilitate use by an adult. It's mounted on the travelling part of the opener mechanism. Yup, go in the garage right now, find the red cord with the red handle and cut the damned handle off! Leave the cord there, just remove the handle from the end.

Why? Crooks have been known to use a coat hanger to fish through the top of your garage door. Then hook onto the cord, let the coat hanger hook the handle, then open your garage door easily from the outside.

Yup, it's COMMON. Do it now. Protect your stuff and your family.

Trickle charger simplicity.

Sometimes motorcycles sit for a while and when you get back to them, the battery is dead. It happens partly because sportbikes have relatively small batteries for their engine size. Lots of people use trickle chargers to solve this problem and so do I. Trick is, I have a cheap solution that's very easy to use.

In my varied line of work, I've managed to collect a few of those plug-in transformer units for electronic equipment. Some of them are rated at 12 volts DC. All of them have convenient little plugs on the end of their wire.

Rating the transformer: All transformers show an input voltage, an output voltage, and a current/power rating. Here's what you want to see: Input 120V AC, output 12V DC. The current/power rating can be shown as XXXX mA (milliamperes), a decimal A (ampere), or as a W (wattage). Here's a pic with all four ratings. Click on it for larger detail. Don't worry about the additional ratings after 120V AC.


So what do we really have for an output? We have 12V DC at 1000 mA (1000 milliamps) or 12W (12 watts). 1000 mA is one ampere. 12 watts into 12V DC is one ampere. Simple electronic math.

Bingo, one FREE battery charger rated at 1 amp!

But there's a small trick. A 12 volt battery won't charge if you only supply it with 12 volts! The charging system on your bike actually puts out between 14 and 18 volts to charge the battery. (In very simple terms, it takes extra electrical 'pressure' to force the electrons back into the battery for storage, so the voltage is increased to help provide this pressure.) Doesn't that mean our nice little transformer needs to put out more than 12V DC? Sure it does, and measurement with a digital volt meter has shown me that ALL of these things put out about 17.5V DC. This is plenty for good charging and it's not so high that it might boil the battery. (Particularly at only one amp.)

Ok, so now we know that these transformers can be used for trickle charging. What about smaller transformers? Sure, you can use them. I have one rated at only 250 mA (1/4 ampere) that I use to maintain a full size car battery I use for an outdoor winch. Here's a pic of that unit. Click on the pic to see the ratings for this unit.


I said my solution was simple to use. On a larger ST with some real estate for accessories, a cigarette lighter plug will work nicely if you just change the wires on the end of the transformer. 12V + (positive) gets wired to the center contact of the cigarette lighter plug. 12V - (negative or frame ground) gets wired to the outer contacts (springs). Just plug the cigarette lighter plug into the lighter jack and you'll be charging (assuming the cig lighter circuit doesn't turn off with the ignition key like it does on many cars nowdays).

Here's a way to do it on a sportbike with real estate issues.

Go to Radio Shack or whoever your local electronic parts supplier is, and buy a jack that fits the plug your free transformer uses. Locate the jack in a convenient but semi-protected place. See pic below with the jack and plug on the rear fender of the R1. Click to make larger.


Obviously wire the new jack to the battery paying close attention to polarity. 12V+ of the transformer plug has to be wired to 12V+ of the battery, and the negative (ground) side needs to be wired to the battery's negative pole. You can use pretty skinny wire for this job because you're actually only pushing 1 amp through the wire. I might stay away from 22 gauge, but 18 gauge will certainly work more than adequately.

ELECTRICAL SAFETY - in the unusual event that you crash and the wires you just installed get cut or shorted to the frame, you can have BIG problems (like fire, explosion, or smoke). Here's how we add a bunch of safety to the equation. Install a 1.5 amp fuse in-line with the 12V+ wire. Make the fuse as close to the battery as you possibly can! You only need the fuse on the 12V+ side, so don't go overboard. Why use a 1.5 amp fuse? It's rated higher than your charger, so the charger won't blow the fuse by itself, but it's also rated WAY WAY WAY lower than what your battery can spontaneously supply in the event of a short. Basically your battery will destroy the fuse before an explosion, fire, or smoking can begin.

It will be obvious to some of you that this new plug can be used in reverse. In other words, you might want to use it to supply voltage to a light, tool, or other item you use outside your bike. Technically it's possible, but I have some warnings.

1) The jack isn't usually rated for more than about 2 amps max, so you can't run a 5 amp tire pump off it without melting the plastic the jack is mounted in.

2) You would need to install a larger in-line fuse to get more than 1.5 amps out of the circuit. This could increase the chance of "the bad things" happening because of a short. Certainly wire gauge plays an important role in this equation and I'm not gonna wander down that road too far.

I think that's all for this topic. I'll edit it again if I see anything I left out.

Always buy black

When buying accessory mounts, or almost anything that mounts on the bike, always buy black.

Why? Black goes with everything. Black will go with your next bike. Velcro comes in black. Flat black spray paint comes in black. Black is hard to see, so thieves won't be attracted to any bling. And finally, black doesn't reflect the sun so you won't get glare in your eyes while riding. Sorry, I don't care if your sweet baby is blue, the blue stuff will be ugly on your next bike. Think about it. Gonna buy one of those orange ZX-10s? Blue goodies on an orange bike? PULEEZE!

Black paint? Here's the hot tip. Rust-oleum Textured spray paint. It's available at Lowes or Home Depot. This stuff is terrific. It produces a lightly sandy finish that closely matches the plastic surfaces of lots of motorcycle plastic work used inside the cockpit. It's resistent to poor painting methods, resists sagging, and is very forgiving of bad surface prep, scratches, and the like. It also doesn't show fingerprints or wear.

Here's a link to the product.
Product pic.


Some examples of painted items on the R1.


Saturday, April 7, 2007

Stealthy accessories

Some items shouldn't be shown to the whole world, but it sure would be convenient to have them on your motorcycle all the time. Loading your jacket pockets with your cell phone, headphones, MP3 player, etc. etc. etc will almost always leave you with something your forgot. That's why I try to keep as much as possible on the bike at all times.

Possibly the thing that should be kept most secure is your garage door opener. You really don't want some low-life to write down your plate number and steal your opener. You might return from your afternoon ride to an empty house. After all, you just gave him the key if he can look up your plate on the internet!

Here's a secret. Thieves generally take only what's obvious and quick. The trick is to make your opener non-obvious. It's a pretty simple three step process.

Step one - buy the smallest garage door opener unit you can find. Genie makes a generic 'learning' opener that can be purchased at Lowes or Home Depot. It works nicely with every modern 'learning' garage door mechanism I've seen.

Step two - paint the little unit flat black (see "Always buy black" in a later blog entry). Simply take the single screw out of the back of the unit. Pop the tiny printed circuit board out, and paint the buttons and body lightly with my recommended paint. Heavy painting will make the buttons stick and that won't be cool.

Step three - use good quality black velcro to mount the garage door opener to the back side of your TechMount. You'll learn where to push the button, but the theives will never see it!

You'll get a couple of brownie points if you can find my garage door opener in the first pic below. It's there and it can be seen, but nobody is gonna guess it's the opener. Obviously I show it in complete detail in the second pic (shown from the bottom up).


Accessory "handedness"

Ok, when a person adds accessories to his or her motorcycle, the first thing to think about should probably be "which hand will I be using this with". From that decision, you can begin to look for a place where the accessory will fit.

Generally, accessories are used by the operators left hand while underway. This is simply because of the need to maintain throttle control while he or she is moving down the road. Remove your right hand from the throttle to operate the GPS, and you might be in for a rude surprise. Most of us learn to do almost everything with our left hand pretty quickly after we start riding.

However, there are other possibilities. As an example, I cite my garage door opener. It's pretty common for me to keep rolling up the driveway while I open the garage door. But it's my habit to stay off the throttle and simply modulate the clutch to control my forward speed. This means that my right hand is free while my left hand is fully occupied. So, my garage door opener is easily accessed with my right hand instead of the usual left hand. See the pics below for ideas and examples.

All I'm really pointing out here is: Think about your personal use and make everything as easy as possible to simplify operation of the controls.

TechMounts Accessory Mounts

Most sportbikes will accept TechMounts accessory mounts. These can be used to mount things like GPS units, cell phones, MP3 players, or whatever you want on a bike with limited real estate. Certainly bigger bikes will accept these mounts too. They're pretty common on BMWs, FJRs and STs.

www.techmounts.com I use the 10991D (double plate stem mount) and the 31001 control mount. Because of the proximity of the windscreen to the bars on the R1, the 31001 needs a small modification to keep it from whacking the fairing at full left lock. Basically, the top bolt hole is slotted to allow for different sizes of controls, but the lower bolt hole is fixed and it makes the mount too tall to fit cleanly. I just added another hole at the bottom (just barely above the original) and everything clears nicely now. Detail pic below.

Here are a few pics on my R1. Click on any pic to get a larger image.

With common gear.


The mod to lower the 31001 away from the fairing at full lock.


More detail. Don't be afraid to use the backside.


And the answer to the garage door opener question from above.

Opening!

This is the first entry into the Motorcycling Tips and Clever Ideas blog. Since it's a blog, this is the first entry only for a short time. Basically it's the end of the blog now.

In any case, I hope you will, or have already gotten some thoughtful ideas from this site. Feel free to send your suggestions thru the comments field. I'll be happy to copy any I feel are suitable.